
- AVLT-DM18-1
- AVLT Single Monitor Desk Mount - Holds 14.3 lbs LCD Computer Screen with Height Adjustable Arm Aluminum Gas Spring C Clamp Grommet Cable Management for 13 to 27 inch Display - Organize Your Work Surface with Ergonomic Viewing Angle VESA Monitor Riser
■ EAN Code:4712896221068 ■ UNIVERSAL FIT - Compatible with 14.3 lbs monitor, 75 x 75mm or 100 x 100mm VESA plate. NOTE: When your monitor fall down, please turn the gas shock counter-clockwise to increase tension
Highlights
UNIVERSAL FIT
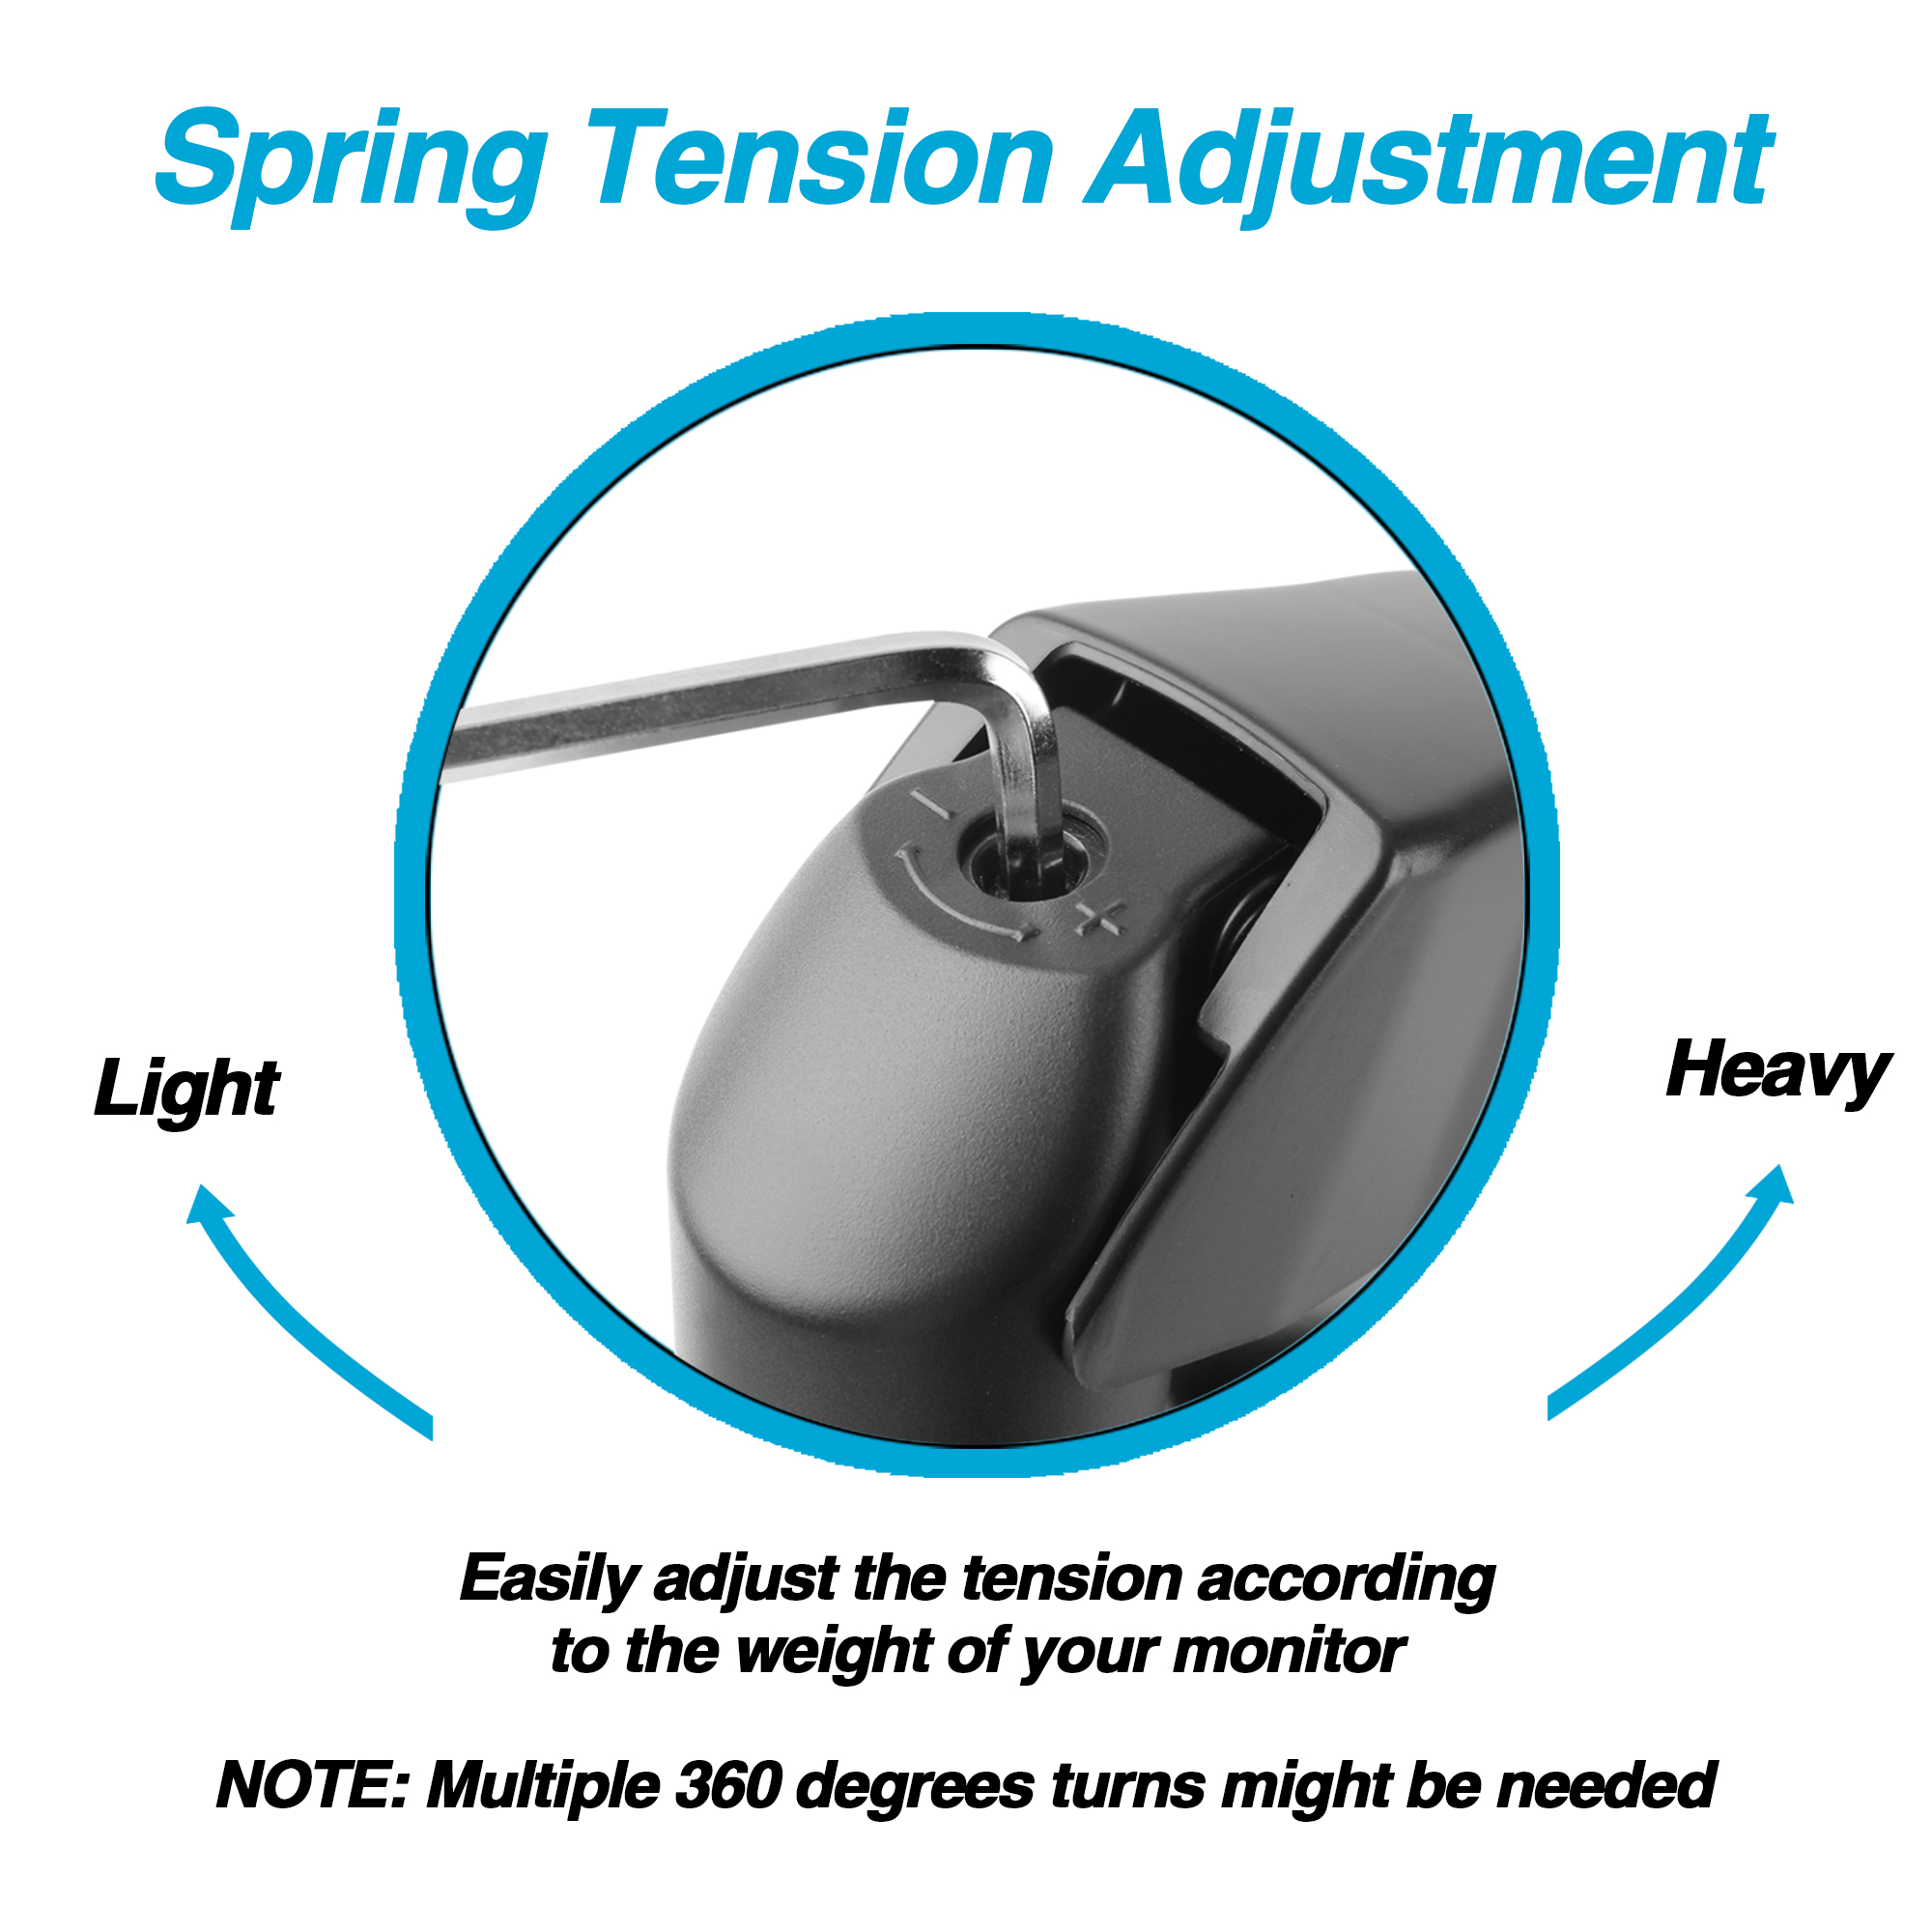
Compatible with 14.3 lbs monitor, 75 x 75mm or 100 x 100mm VESA plate. NOTE: When your monitor fall down, please turn the gas shock counter-clockwise to increase tension
ALUMINUM GAS SPRING SYSTEM
This product is backed with THREE YEARS limited warranty. Let the time to prove the quality of our Single Monitor Desk Mount
THE BENEFITS
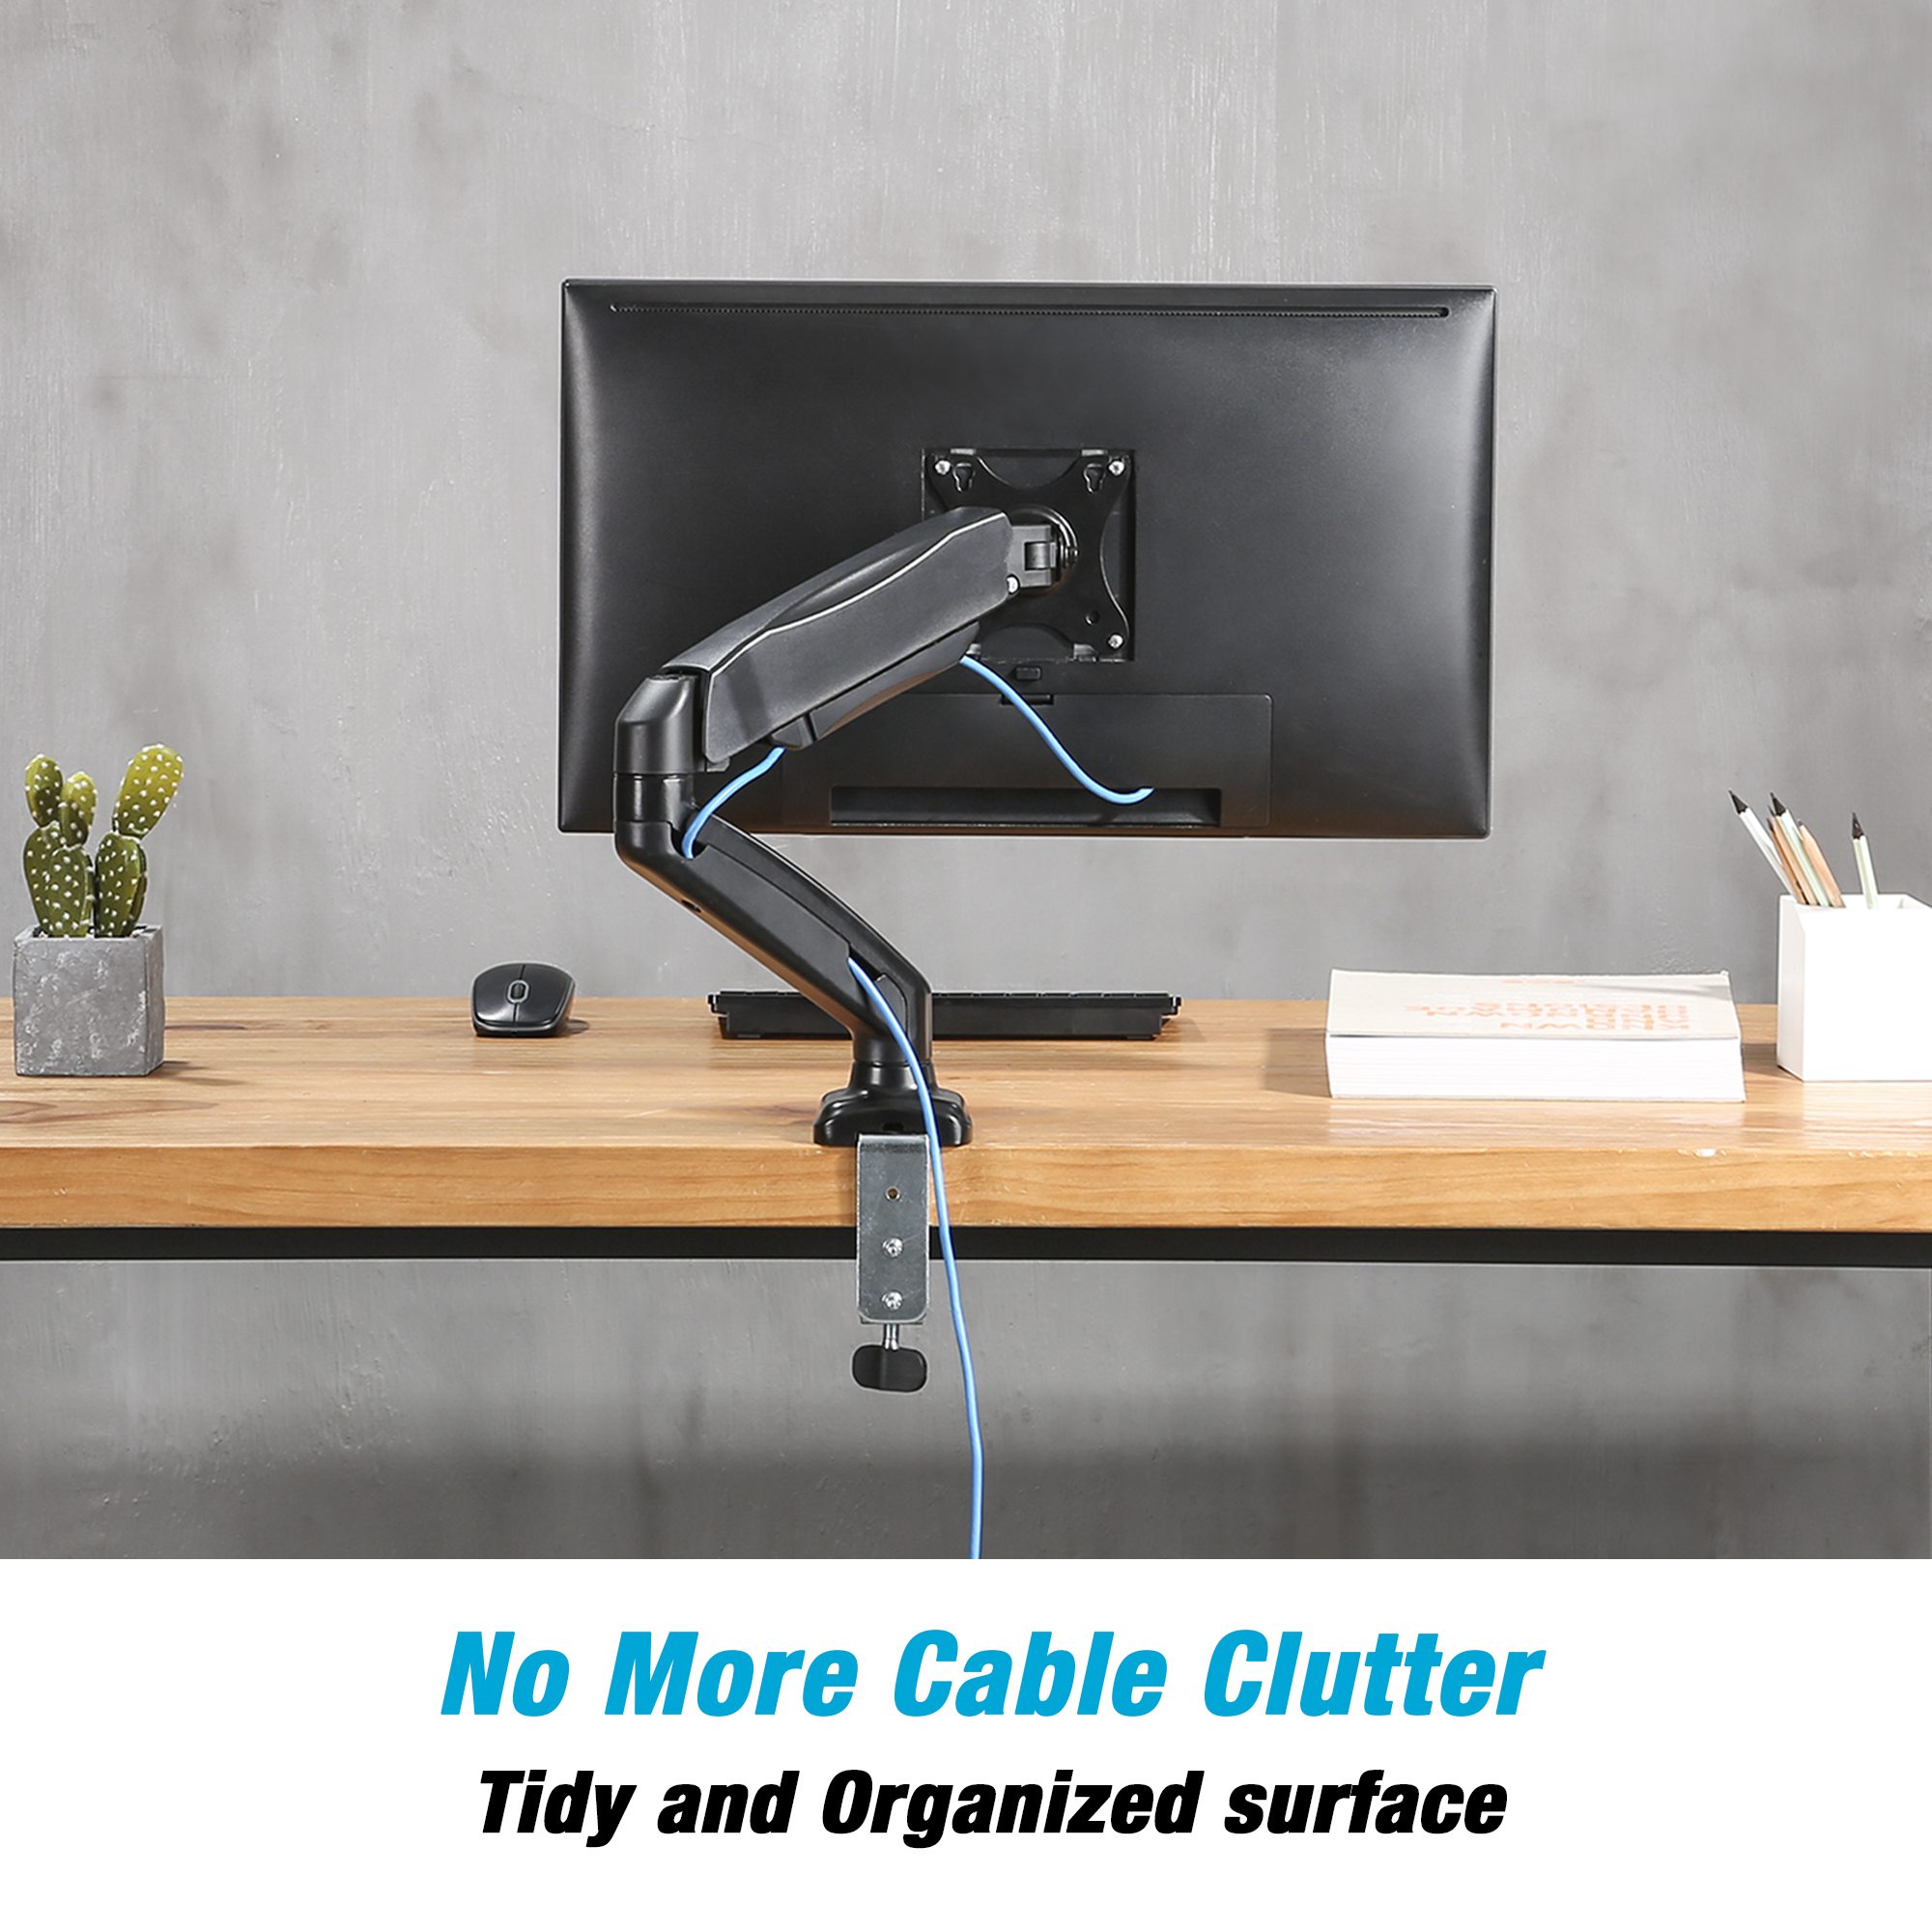
Spacious workspace, Ergonomic viewing angle, Reduce back & neck strain and the most importantly【Happy Workers Are Productive Workers】
EFFORTLESS ASSEMBLY
Comes with manual & all needed kits, using the built-in integrated cable management smarten up your desktop
SPECS & SUPPORT
Specification
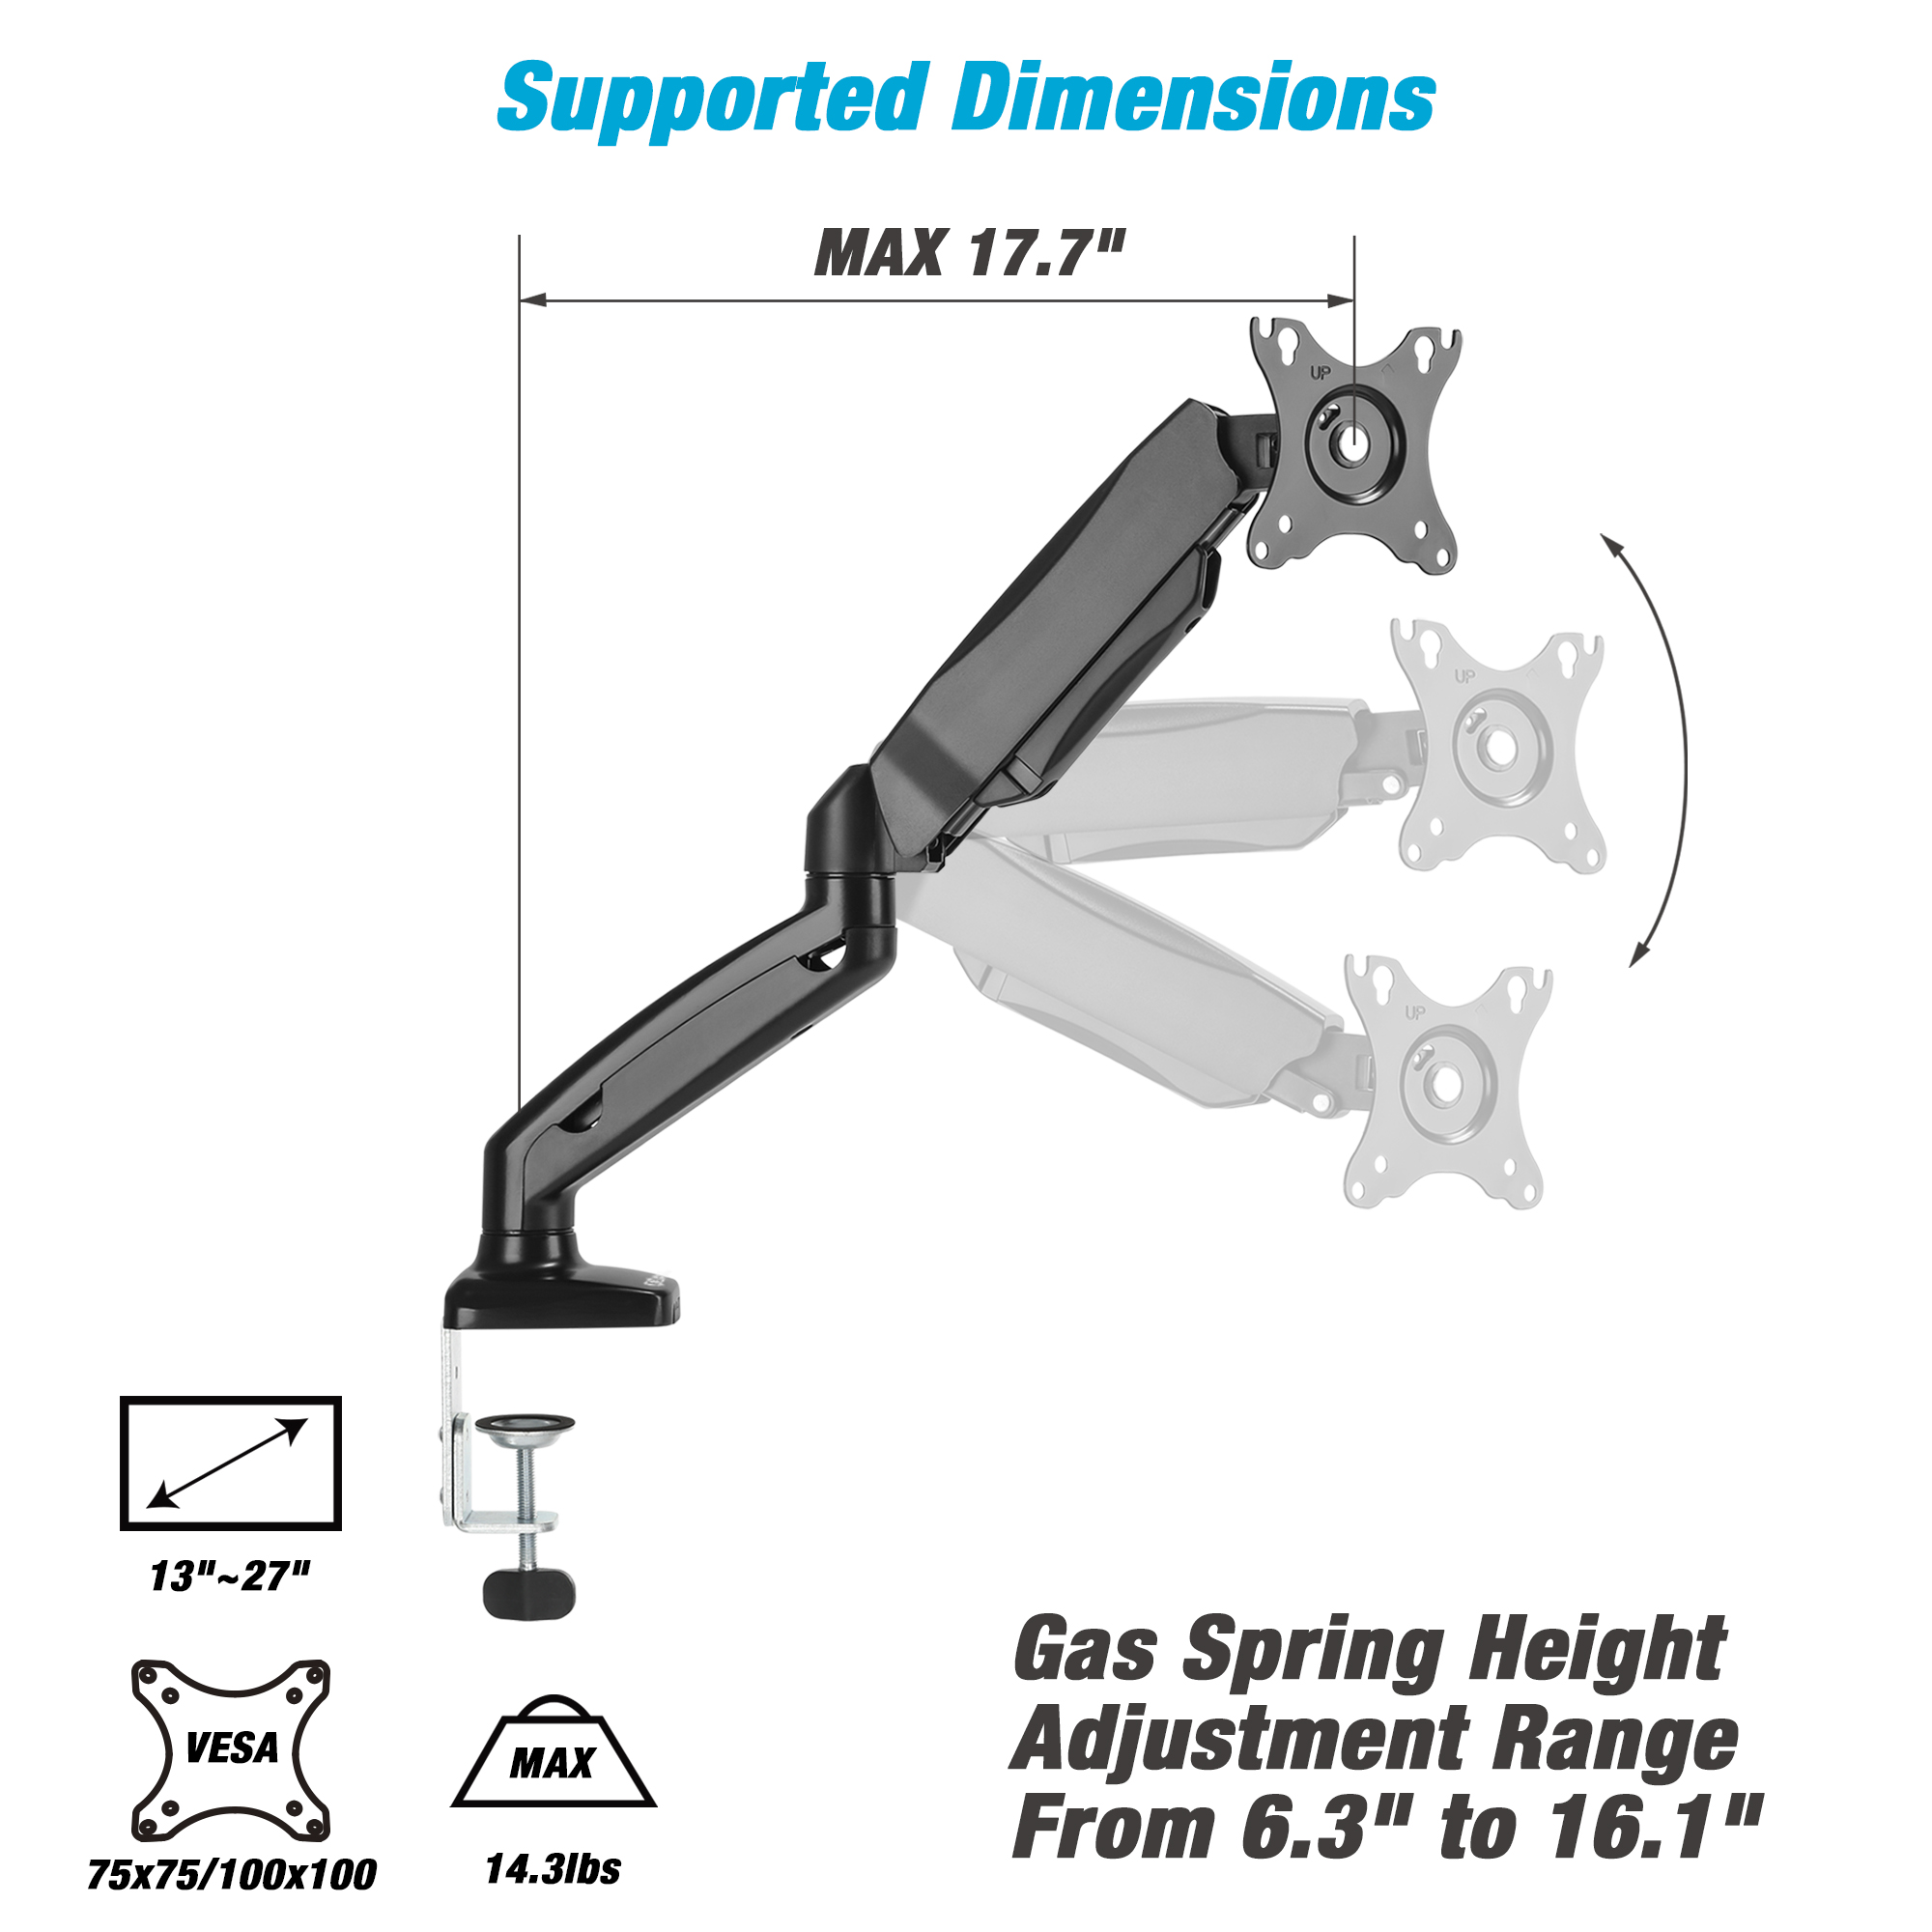
Weight capacity: Up to 14.3 lbs
Display size: 13 to 27 inches
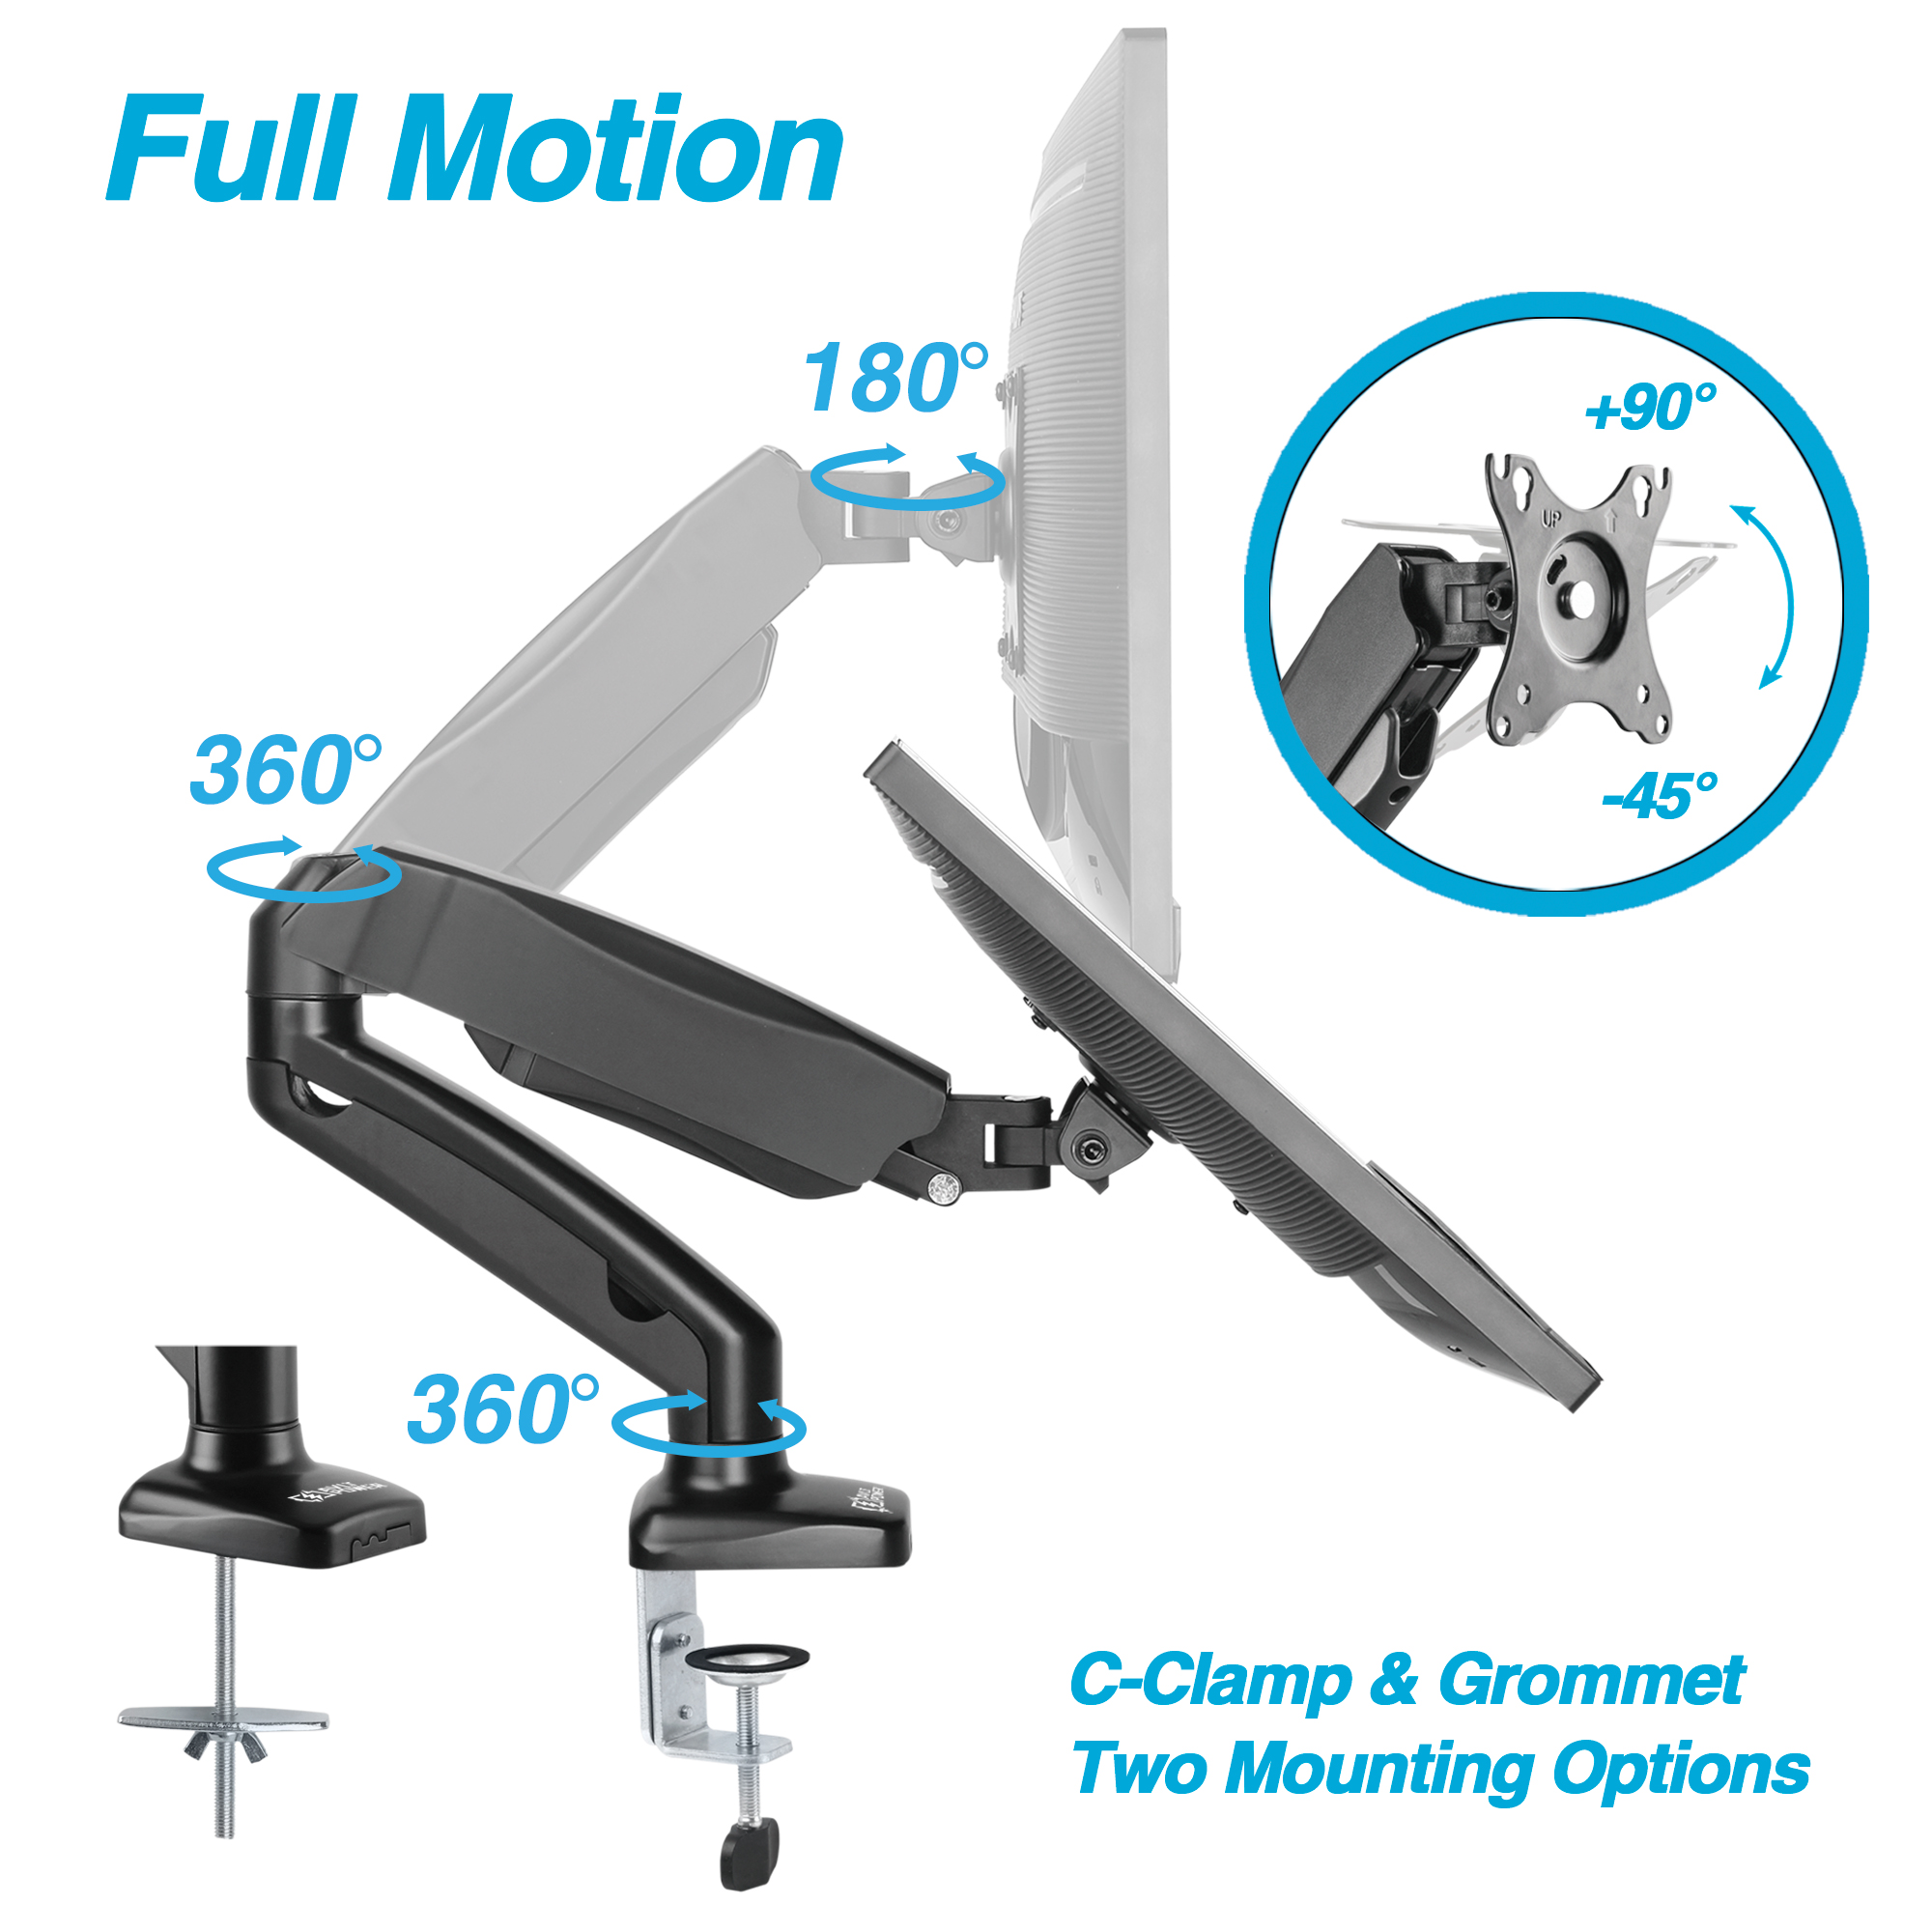
Tilt angle: +90°/-45°
Swivel: ±90°
Pan angle: ±180°
VESA mounting pattern: 75x75mm and 100x100mm
Color: Black
Warranty: Three years
Video Instruction for Gas Spring Adjustment:
FAQ
- 1. What are VESA interfaces?
- The back of some monitors has a set of pre-designed mounting hole pattern for mounting it to a monitor arm. Please check the Quick Installation Guide or measure the distance between the horizontal and vertical mounting holes on the back of your monitor. You may also contact us if displays do not have a VESA 75x75mm or 100mmx100mm mounting hole pattern, we will assist you with finding a suitable adapter.
- 2. How to install a VESA monitor to a monitor arm?
- Please align the VESA mounting pattern of your monitor to the VESA monitor arm, then install the bolts and washers on both products.
- 3. Pre-installation notes when using a C-Clamp:
- a. The C-clamp occupies at least 3cm (1-inch) between your table and wall when installed. b. Please use the included non-slip and scratch-resistant silicone stickers to increase stability and prevent scratches on your desk. c. Not suitable for desks where the clamp cannot be installed flatly to the desktop. d. Not suitable for installation if your table is surrounded by obstacles.
- 4. Pre-installation notes when using a Grommet installation:
- a. The bolt diameter is 1cm (0.4-inch). Please make sure the hole diameter for your table is larger than this. b. Please use the included non-slip and scratch-resistant silicone pads to increase stability and prevent scratches on your desk.
- 5. Pre-installation notes when installing your monitor arm on the pole:
- Most connections between the monitor arm and pole uses a tool free design. The retractable handle can be pulled outward to reposition the monitor arm.
- 6. Pre-installation notes when using a detachable VESA plate:
- a. The force of monitor arm might not be adjusted perfectly to support the weight of your display. During installation, please take precaution and release the monitor slowly. Do not let go of the display instantly as the monitor arm may need further tension adjustments. b. The back of the detachable VESA plate has two hex socket cap screws which may sometimes loosen during transportation and cause the monitor to not install properly to the monitor arm. Use an allen key to tighten the hex socket cap screws to resolve any monitor swaying problem.
- 7. Pre-installation notes when adjusting the VESA plate on the monitor arm:
- a. The VESA head of the monitor arm supports both landscape and portrait orientation, it is kept in position by using friction. Thus, it is normal for the VESA head to not be rotatable before a VESA monitor is installed. It is not a defect in the product design. b. The VESA head at monitor arm supports both horizontal and vertical tilt adjustment. When installing a curved or ultrawide monitor, please tighten the vertical tilt bolt.
- 8. How to adjust the tension of your gas spring monitor arm and float your monitor at any position?
- The advantage of gas spring monitor arm is to reduce the force required to adjust your monitor position. It helps you to move your monitor up and down easily and float the monitor within the allowable height. Please install the monitor on the monitor arm before using the included Allen key to adjust gas spring arm tension. The arm tension can be adjusted to accommodate the monitor weight when installed. a. When the monitor arm droops, this means the tension in the monitor arm is insufficient. Rotate Allen Key in the direction of the “+” symbol to fix monitor drooping. b. When monitor arm floats up by itself, this means the tension in the monitor arm is too strong. Rotate Allen Key in the direction of the “-” symbol to fix monitor floating until the monitor arm floats in a stationary position. Video Instruction for Gas Spring Adjustment: https://www.youtube.com/watch?v=TRdK9RkCUEs
- 9. Pre-installation notes for Gas Spring Monitor Arm:
- a. Most gas spring monitor arms are fastened by cable tie out of the box, take precaution when removing the cable tie as the monitor arms may expand. b. If the monitor arm has not been moved for over a month, you may need to readjust the gas spring tension with the Allen key before using it.
- 10. Pre-installation notes for Cable Management:
- Most cable management cover can be removed without any tools. To avoid the cover falling off during transportation, the cover is designed to attach securely. Please refer to the installation guide for sliding out the cover for cable management.